 Ryan Zhang's Blog


🐾 OpenClaw Installation Guide and Personal Thoughts — 2026.03
Translation Notice
This article was originally written in Chinese and translated into English with the assistance of AI. The translation has been reviewed and edited for clarity, accuracy, and readability. Please refer to the original source where necessary, especially for technical terms, commands, configuration details, and proper nouns.
Updated on March 9, 2026, based on OpenClaw v2026.3.7 and the Feishu Open Platform 2026 Q1 specifications.
© 2026 OpenClaw Community | A secure, transparent AI assistant for everyone
🔍 Why Install OpenClaw Now?
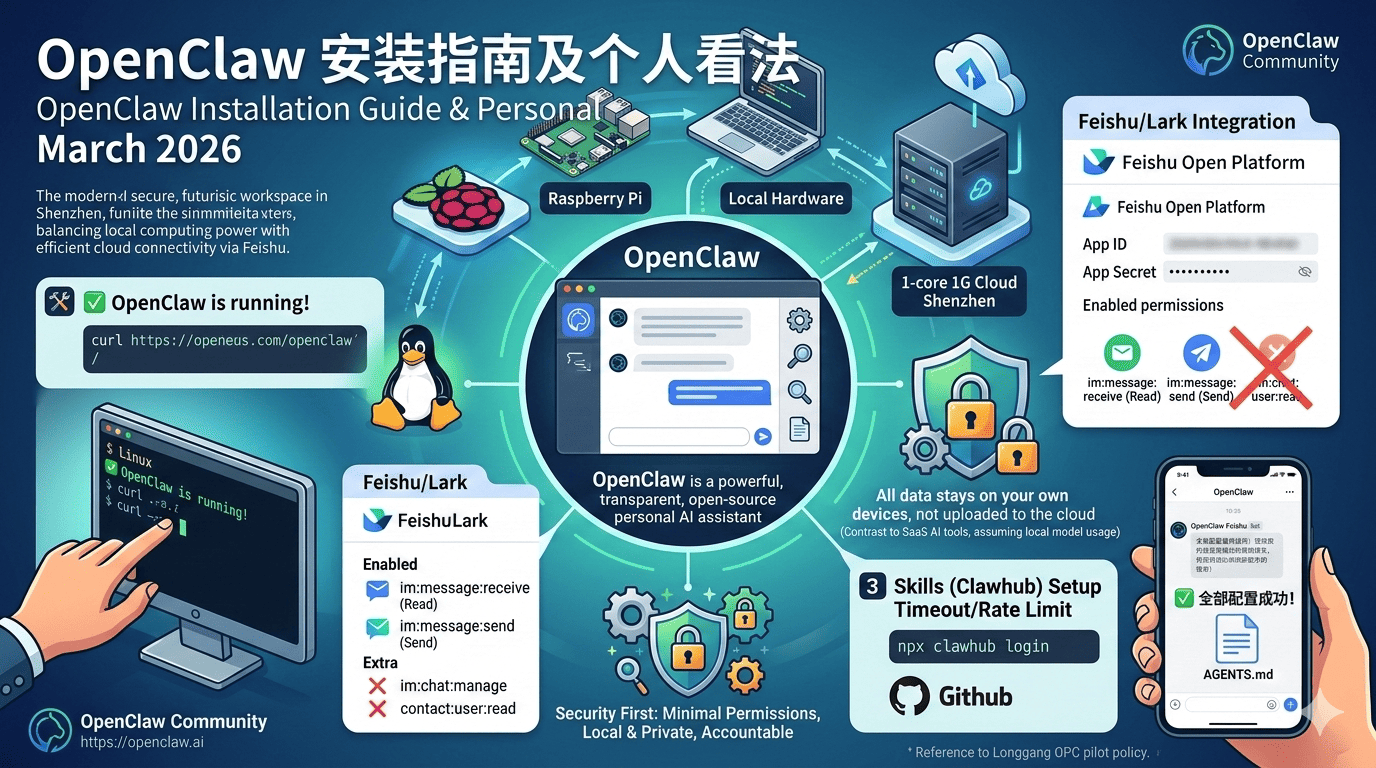
Tencent Cloud Shenzhen offers OpenClaw without deployment. At minimum, you need a device connected 24/7—a Raspberry Pi, old laptop, or 1-core/1 GB cloud server will do. All data stays on your own device and is not uploaded to the cloud, provided your model also runs locally.
Longgang, Shenzhen, has even begun piloting policies for one-person OPC companies (see the relevant public consultation notice).
⚠️ Note: all procedures in this article use official channels. Use only the official website: https://openclaw.ai. Other domains are unofficial mirrors; never enter sensitive information there.
🛠️ Step 1: Install OpenClaw
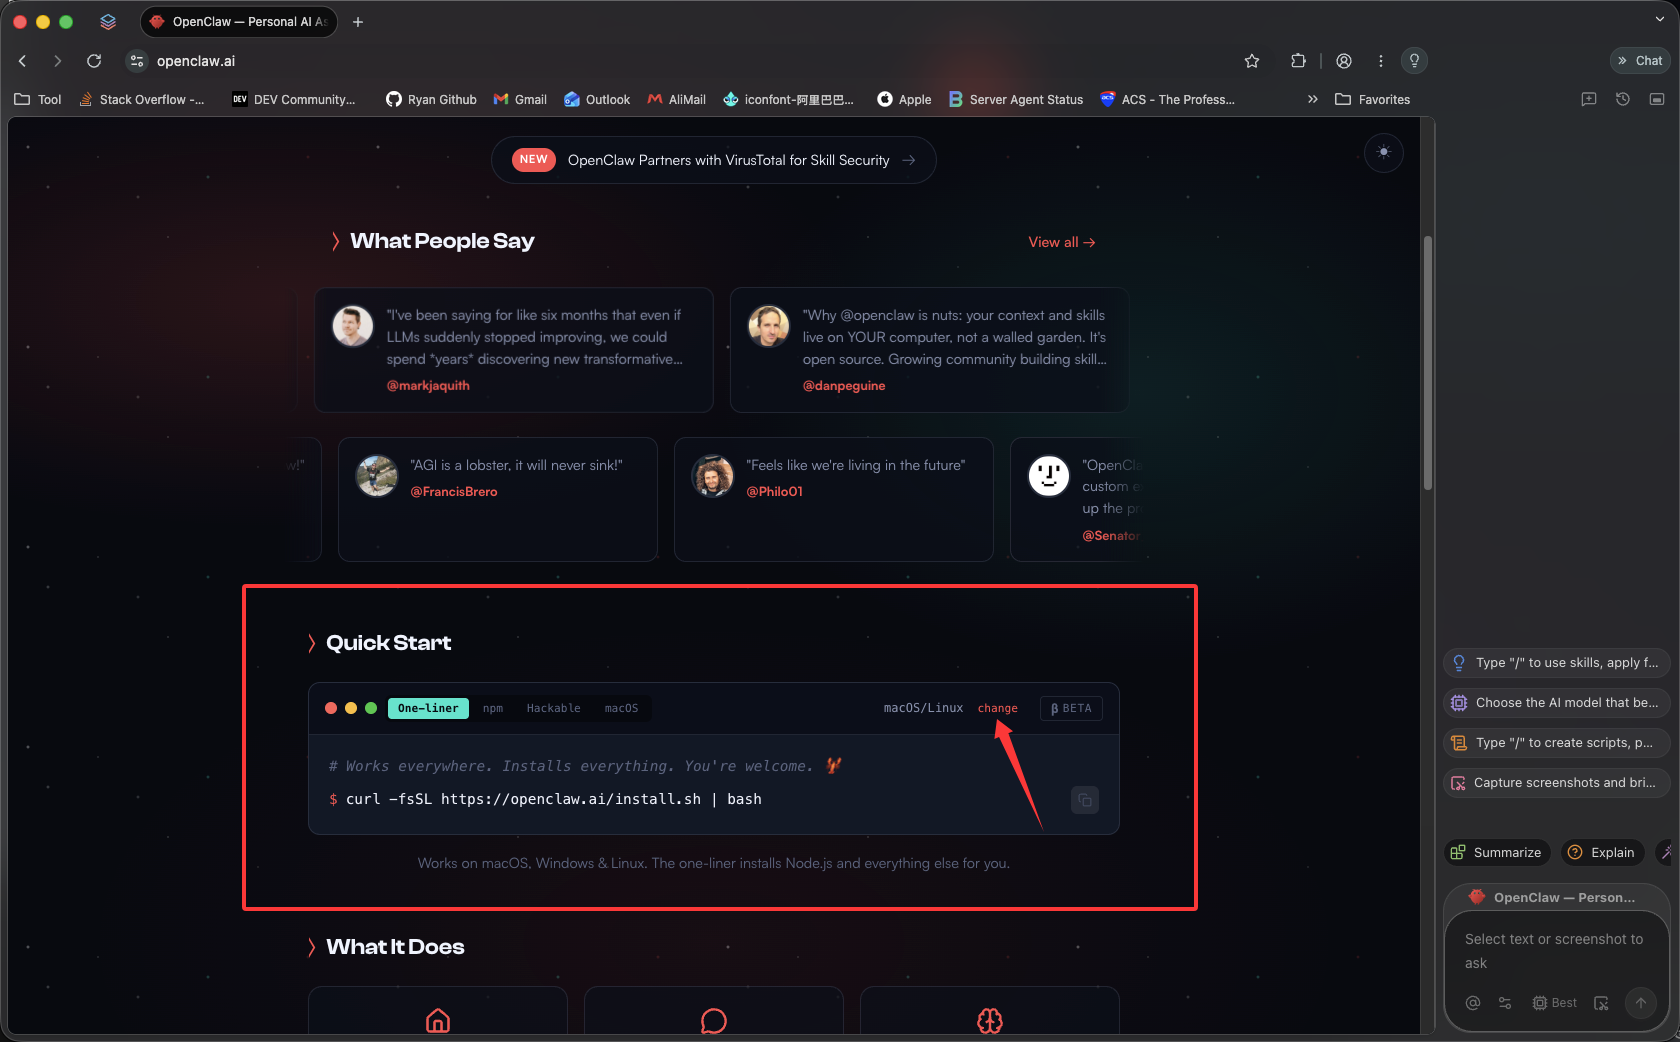
Run the following in your Linux terminal (Ubuntu/CentOS/Debian):
curl -fsSL https://openclaw.ai/install.sh | bash✅ The command automatically:
- Downloads the latest binary
- Creates the system service (openclaw-gateway)
- Starts the daemon
- Prints ✅ OpenClaw is running!
💡 Tip: if you use a cloud server, make sure its security group allows the OpenClaw Web UI’s default port.
Installation and Configuration
- After running the one-click installation command, non-administrators will be asked for a sudo-enabled account password.
ubuntu@test-openclaw:~$ curl -fsSL https://openclaw.ai/install.sh | bash
🦞 OpenClaw Installer I'm not saying your workflow is chaotic... I'm just bringing a linter and a helmet.
✓ Detected: linux
Install planOS: linuxInstall method: npmRequested version: latest
[1/3] Preparing environment· Node.js not found, installing it now· Installing Node.js via NodeSource· Administrator privileges required; enter your password[sudo] password for ubuntu:- Continue to the initial configuration.
The project evolves very quickly; by the time this article was written, version 2026.3.8 had already been pushed…
For I understand this is personal-by-default and shared/multi-user use requires lock-down. Continue?, choose yes and press Enter.
🦞 OpenClaw installed successfully (OpenClaw 2026.3.8 (3caab92))!Ahh nice, I like it here. Got any snacks?
· Starting setup
🦞 OpenClaw 2026.3.8 (3caab92) — I'm not magic—I'm just extremely persistent with retries and coping strategies.
▄▄▄▄▄▄▄▄▄▄▄▄▄▄▄▄▄▄▄▄▄▄▄▄▄▄▄▄▄▄▄▄▄▄▄▄▄▄▄▄▄▄▄▄▄▄▄▄▄▄▄▄██░▄▄▄░██░▄▄░██░▄▄▄██░▀██░██░▄▄▀██░████░▄▄▀██░███░████░███░██░▀▀░██░▄▄▄██░█░█░██░█████░████░▀▀░██░█░█░████░▀▀▀░██░█████░▀▀▀██░██▄░██░▀▀▄██░▀▀░█░██░██▄▀▄▀▄██▀▀▀▀▀▀▀▀▀▀▀▀▀▀▀▀▀▀▀▀▀▀▀▀▀▀▀▀▀▀▀▀▀▀▀▀▀▀▀▀▀▀▀▀▀▀▀▀▀▀▀▀ 🦞 OPENCLAW 🦞
┌ OpenClaw onboarding│◇ Security ─────────────────────────────────────────────────────────────────────────────────╮│ ││ Security warning — please read. ││ ││ OpenClaw is a hobby project and still in beta. Expect sharp edges. ││ By default, OpenClaw is a personal agent: one trusted operator boundary. ││ This bot can read files and run actions if tools are enabled. ││ A bad prompt can trick it into doing unsafe things. ││ ││ OpenClaw is not a hostile multi-tenant boundary by default. ││ If multiple users can message one tool-enabled agent, they share that delegated tool ││ authority. ││ ││ If you’re not comfortable with security hardening and access control, don’t run ││ OpenClaw. ││ Ask someone experienced to help before enabling tools or exposing it to the internet. ││ ││ Recommended baseline: ││ - Pairing/allowlists + mention gating. ││ - Multi-user/shared inbox: split trust boundaries (separate gateway/credentials, ideally ││ separate OS users/hosts). ││ - Sandbox + least-privilege tools. ││ - Shared inboxes: isolate DM sessions (`session.dmScope: per-channel-peer`) and keep ││ tool access minimal. ││ - Keep secrets out of the agent’s reachable filesystem. ││ - Use the strongest available model for any bot with tools or untrusted inboxes. ││ ││ Run regularly: ││ openclaw security audit --deep ││ openclaw security audit --fix ││ ││ Must read: https://docs.openclaw.ai/gateway/security ││ │├────────────────────────────────────────────────────────────────────────────────────────────╯│◆ I understand this is personal-by-default and shared/multi-user use requires lock-down. Continue?│ ● Yes / ○ No- Enter the simplified QuickStart setup.
Select QuickStart and press Enter.
◇ I understand this is personal-by-default and shared/multi-user use requires lock-down. Continue?│ Yes│◆ Onboarding mode│ ● QuickStart (Configure details later via openclaw configure.)│ ○ Manual└- Choose to skip this step and configure the model API later.
Select Skip for now and press Enter.
◆ Model/auth provider│ ○ OpenAI│ ○ Anthropic│ ○ Chutes│ ○ vLLM│ ○ MiniMax│ ○ Moonshot AI (Kimi K2.5)│ ○ Google│ ○ xAI (Grok)│ ○ Mistral AI│ ○ Volcano Engine│ ○ BytePlus│ ○ OpenRouter│ ○ Kilo Gateway│ ○ Qwen│ ○ Z.AI│ ○ Qianfan│ ○ Copilot│ ○ Vercel AI Gateway│ ○ OpenCode Zen│ ○ Xiaomi│ ○ Synthetic│ ○ Together AI│ ○ Hugging Face│ ○ Venice AI│ ○ LiteLLM│ ○ Cloudflare AI Gateway│ ○ Custom Provider│ ● Skip for now└- Select all model providers.
Select All providers and press Enter.
◆ Filter models by provider│ ● All providers│ ○ amazon-bedrock│ ○ anthropic│ ○ azure-openai-responses│ ○ cerebras│ ○ github-copilot│ ○ google│ ○ google-antigravity│ ○ google-gemini-cli│ ○ google-vertex│ ○ groq│ ○ huggingface│ ○ kimi-coding│ ○ minimax│ ○ minimax-cn│ ○ mistral│ ○ openai│ ○ openai-codex│ ○ opencode│ ○ opencode-go│ ○ openrouter│ ○ vercel-ai-gateway│ ○ xai│ ○ zai└- For the default model, press Enter and change it later.
Default model│ ● Keep current (default: anthropic/claude-opus-4-6)│ ○ Enter model manually│ ○ amazon-bedrock/anthropic.claude-3-haiku-20240307-v1:0│ ○ amazon-bedrock/anthropic.claude-3-5-haiku-20241022-v1:0│ ○ amazon-bedrock/anthropic.claude-haiku-4-5-20251001-v1:0│ ○ amazon-bedrock/eu.anthropic.claude-haiku-4-5-20251001-v1:0│ ○ amazon-bedrock/global.anthropic.claude-haiku-4-5-20251001-v1:0│ ○ amazon-bedrock/us.anthropic.claude-haiku-4-5-20251001-v1:0│ ○ amazon-bedrock/anthropic.claude-3-opus-20240229-v1:0│ ○ amazon-bedrock/anthropic.claude-opus-4-20250514-v1:0│ ○ amazon-bedrock/us.anthropic.claude-opus-4-20250514-v1:0│ ○ amazon-bedrock/anthropic.claude-opus-4-1-20250805-v1:0│ ○ amazon-bedrock/us.anthropic.claude-opus-4-1-20250805-v1:0│ ○ amazon-bedrock/anthropic.claude-opus-4-5-20251101-v1:0│ ○ amazon-bedrock/eu.anthropic.claude-opus-4-5-20251101-v1:0│ ○ amazon-bedrock/global.anthropic.claude-opus-4-5-20251101-v1:0│ ○ amazon-bedrock/us.anthropic.claude-opus-4-5-20251101-v1:0│ ○ amazon-bedrock/anthropic.claude-opus-4-6-v1│ ○ amazon-bedrock/eu.anthropic.claude-opus-4-6-v1│ ○ amazon-bedrock/global.anthropic.claude-opus-4-6-v1│ ○ amazon-bedrock/us.anthropic.claude-opus-4-6-v1│ ○ amazon-bedrock/anthropic.claude-3-sonnet-20240229-v1:0│ ○ amazon-bedrock/anthropic.claude-3-5-sonnet-20240620-v1:0│ ○ amazon-bedrock/anthropic.claude-3-5-sonnet-20241022-v2:0│ ○ amazon-bedrock/anthropic.claude-3-7-sonnet-20250219-v1:0│ ○ amazon-bedrock/anthropic.claude-sonnet-4-20250514-v1:0│ ○ amazon-bedrock/eu.anthropic.claude-sonnet-4-20250514-v1:0│ ○ amazon-bedrock/global.anthropic.claude-sonnet-4-20250514-v1:0│ ○ amazon-bedrock/us.anthropic.claude-sonnet-4-20250514-v1:0│ ○ amazon-bedrock/anthropic.claude-sonnet-4-5-20250929-v1:0│ ○ amazon-bedrock/eu.anthropic.claude-sonnet-4-5-20250929-v1:0│ ...- Skip the communication channel and configure it later.
Select Skip for now and press Enter.
◆ Select channel (QuickStart)│ ○ Telegram (Bot API)│ ○ WhatsApp (QR link)│ ○ Discord (Bot API)│ ○ IRC (Server + Nick)│ ○ Google Chat (Chat API)│ ○ Slack (Socket Mode)│ ○ Signal (signal-cli)│ ○ iMessage (imsg)│ ○ LINE (Messaging API)│ ○ Feishu/Lark│ ○ Nostr (NIP-04 DMs)│ ○ Microsoft Teams (Bot Framework)│ ○ Mattermost (plugin)│ ○ Nextcloud Talk (self-hosted)│ ○ Matrix (plugin)│ ○ BlueBubbles (macOS app)│ ○ Zalo (Bot API)│ ○ Zalo (Personal Account)│ ○ Synology Chat (Webhook)│ ○ Tlon (Urbit)│ ● Skip for now (You can add channels later via `openclaw channels add`)- Skip this step.
Select Skip for now and press Enter.
◆ Search provider│ ○ Brave Search (Structured results · country/language/time filters)│ ○ Gemini (Google Search)│ ○ Grok (xAI)│ ○ Kimi (Moonshot)│ ○ Perplexity Search│ ● Skip for now- Skip Skills configuration by choosing No; configure it later.
◇ Configure skills now? (recommended)│ ○ No- Skip this step.
Select Skip for now, press Space, and then press Enter.
◆ Enable hooks?│ ◼ Skip for now│ ◻ 🚀 boot-md│ ◻ 📎 bootstrap-extra-files│ ◻ 📝 command-logger│ ◻ 💾 session-memory└- Continue to gateway installation.
◇ Systemd ────────────────────────────────────────────────────────────────────────────────╮│ ││ Linux installs use a systemd user service by default. Without lingering, systemd stops ││ the user session on logout/idle and kills the Gateway. ││ Enabling lingering now (may require sudo; writes /var/lib/systemd/linger). ││ │├──────────────────────────────────────────────────────────────────────────────────────────╯│◇ Systemd ───────────────────────────────╮│ ││ Enabled systemd lingering for ubuntu. ││ │├─────────────────────────────────────────╯│◇ Gateway service runtime ────────────────────────────────────────────╮│ ││ QuickStart uses Node for the Gateway service (stable + supported). ││ │├──────────────────────────────────────────────────────────────────────╯│◓ Installing Gateway service…Installed systemd service: /home/ubuntu/.config/systemd/user/openclaw-gateway.service◇ Gateway service installed.- Choose to open it with the web UI.
◆ How do you want to hatch your bot?│ ○ Hatch in TUI (recommended)│ ● Open the Web UI│ ○ Do this later- Startup succeeded.
◇ Dashboard ready ────────────────────────────────────────────────────────────────╮│ ││ Dashboard link (with token): ││ http://127.0.0.1:18789/#token=182ec5402f50c026486e4131dcc144e43b597ccc0855403a ││ Copy/paste this URL in a browser on this machine to control OpenClaw. ││ No GUI detected. Open from your computer: ││ Then open: ││ http://localhost:18789/ ││ http://localhost:18789/#token=182ec5402f50c026486e4131dcc144e43b597ccc0855403a ││ Docs: ││ https://docs.openclaw.ai/gateway/remote ││ https://docs.openclaw.ai/web/control-ui ││ │├──────────────────────────────────────────────────────────────────────────────────╯- Access the Web UI.
For security, the OpenClaw port accepts connections only from the local machine. You can use SSH port forwarding to expose it on a local port.
After running it, use the following address to access OpenClaw’s web interface.
http://127.0.0.1:18789/#token=182ec5402f50c026486e4131dcc144e43b597ccc0855403a
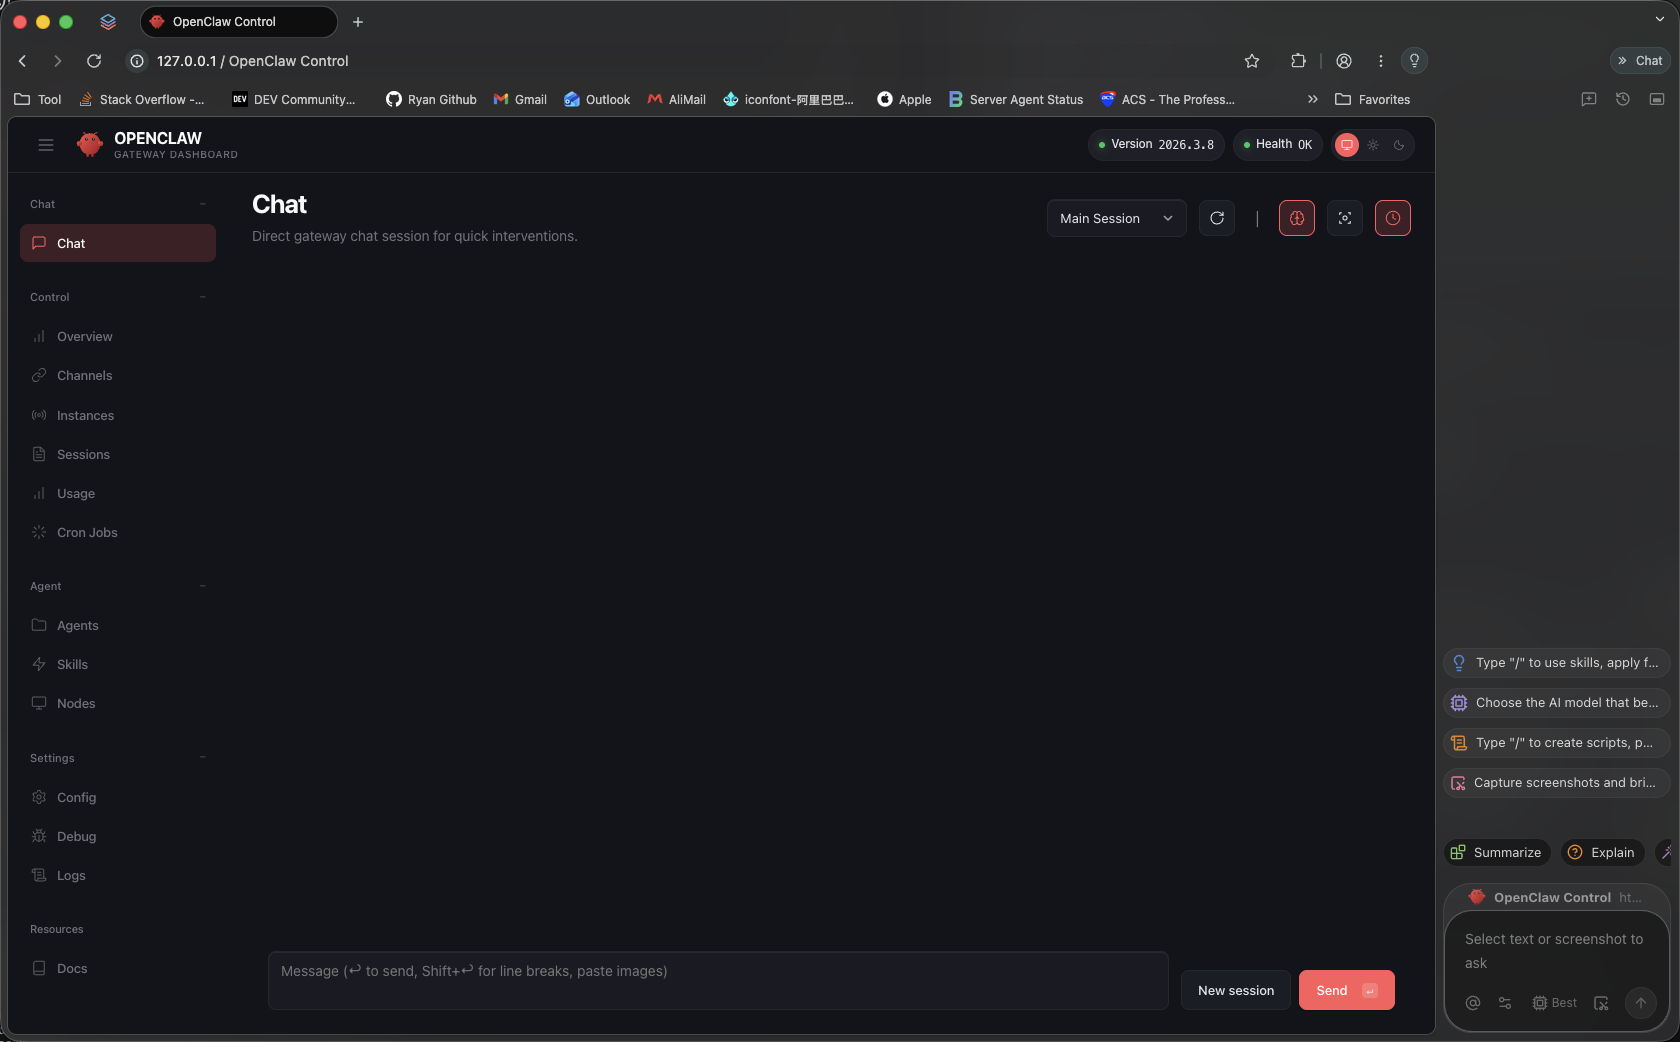
- Model configuration, using local Ollama as an example.
All OpenClaw configuration is managed with openclaw config.
◇ Where will the Gateway run?│ Local (this machine)│◇ Select sections to configure│ Model│◇ Model/auth provider│ Custom Provider│◇ API Base URL│ http://192.129.15.221/v1│◇ How do you want to provide this API key?│ Paste API key now│◇ API Key (leave blank if not required)│ sk-kM5pnfu6vnaNlkbXBkEuyGX6qvOh1uGopmXFx3uR6iIC2QVu│◇ Endpoint compatibility│ OpenAI-compatible│◇ Model ID│ Qwen-Plus│◇ Verification successful.│◇ Endpoint ID│ custom-model1│◇ Model alias (optional)│ qwen-pulsConfigured custom provider: custom-model1/Qwen-PlusUpdated ~/.openclaw/openclaw.json│◆ Select sections to configure│ ○ Workspace│ ○ Model│ ○ Web tools│ ○ Gateway│ ○ Daemon│ ○ Channels│ ○ Skills│ ○ Health check│ ● Continue (Done)🦋 Step 2: Configure the Feishu (Lark) Bot
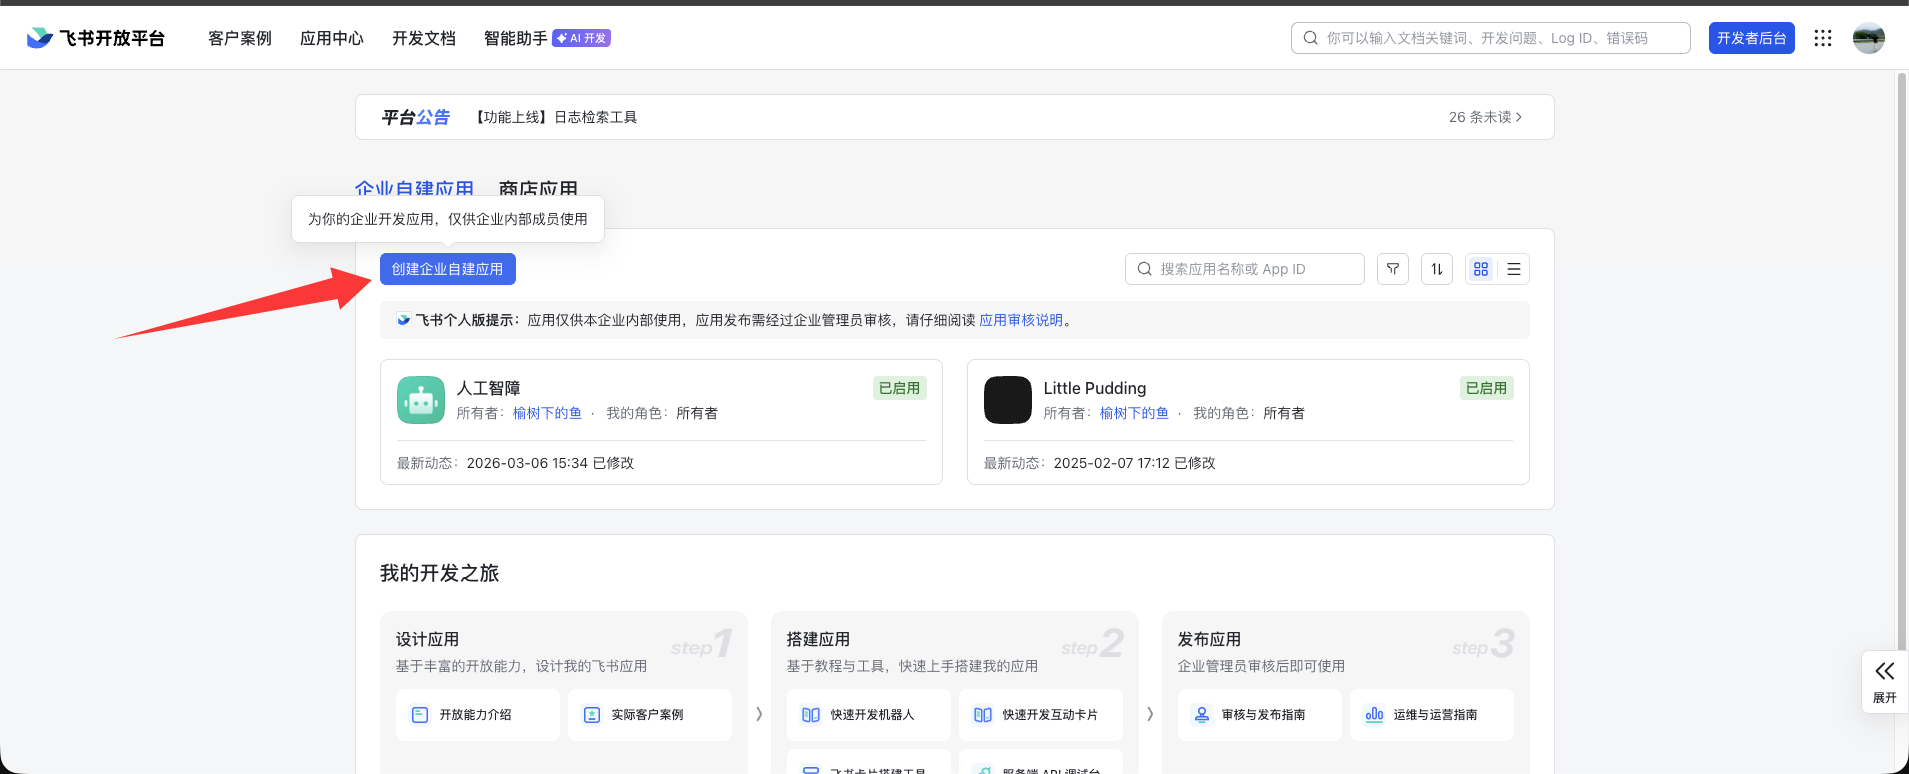
Open the Feishu Open Platform (https://open.feishu.cn/app).
OpenClaw uses Feishu to receive commands and return results. Follow these steps in order:
| Step | Action | Key reminder |
|---|---|---|
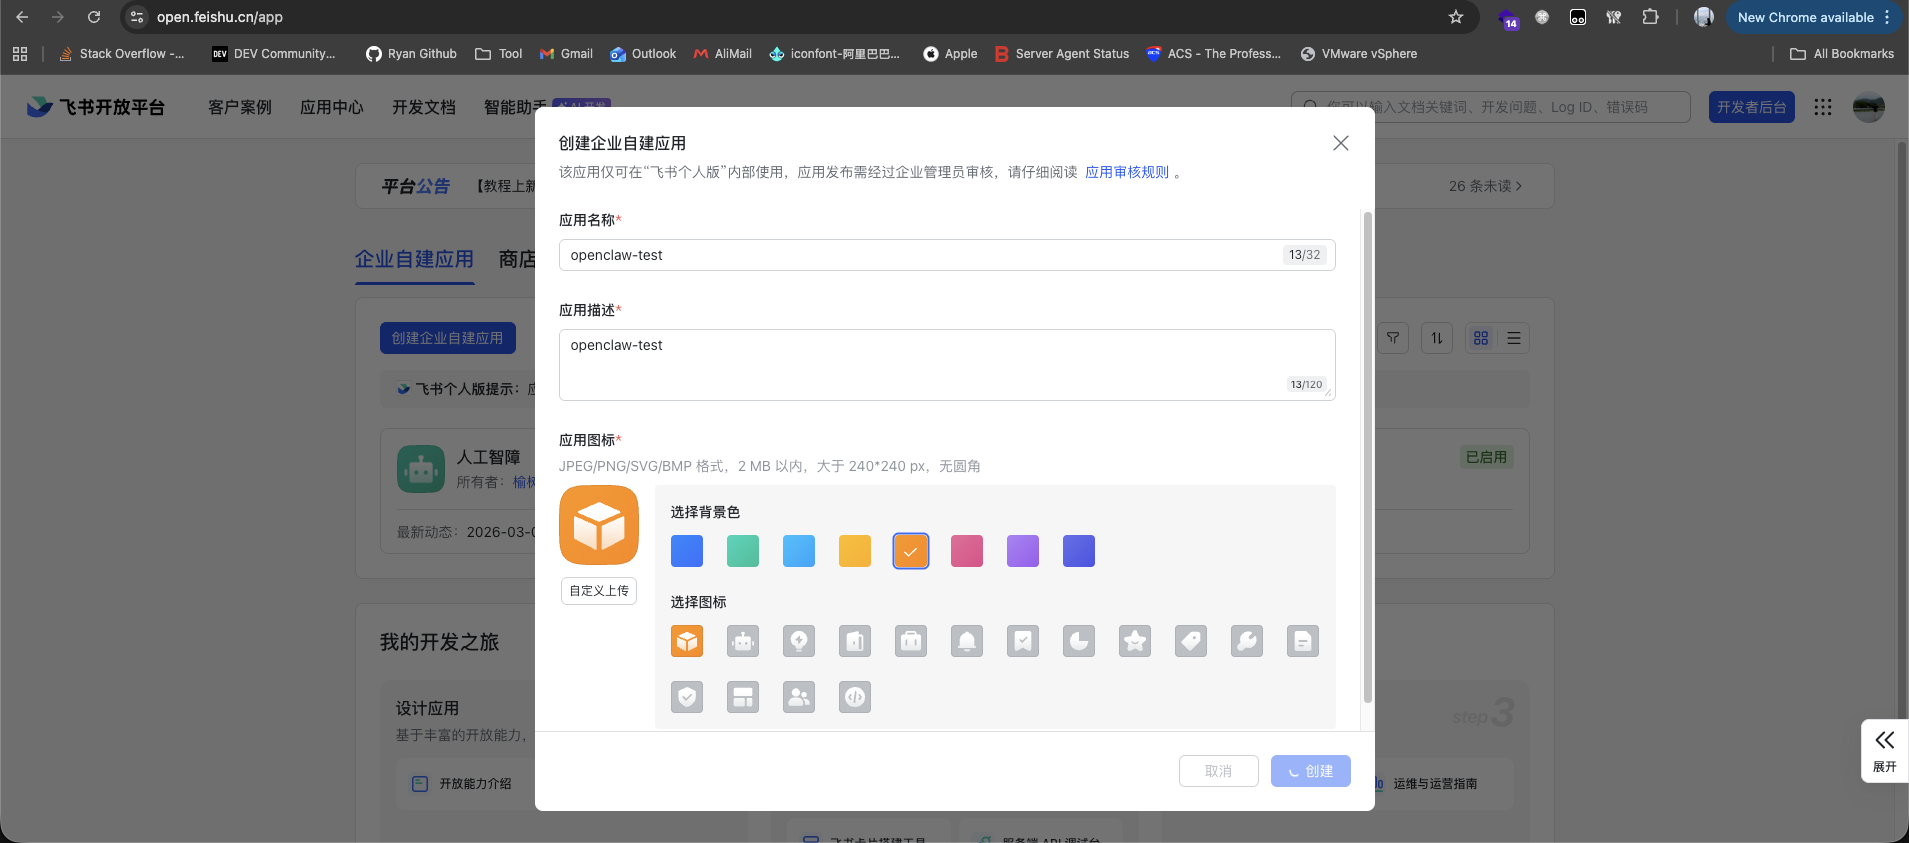
| ① Create app | Open Feishu Open Platform → click “Create App” → choose “Bot” | Suggested name: OpenClaw-Personal Assistant |
| ② Configure bot | Bot Settings → copy App ID and App Secret → paste them into ~/.openclaw/config.yaml | ❗ Never disclose the App Secret! |
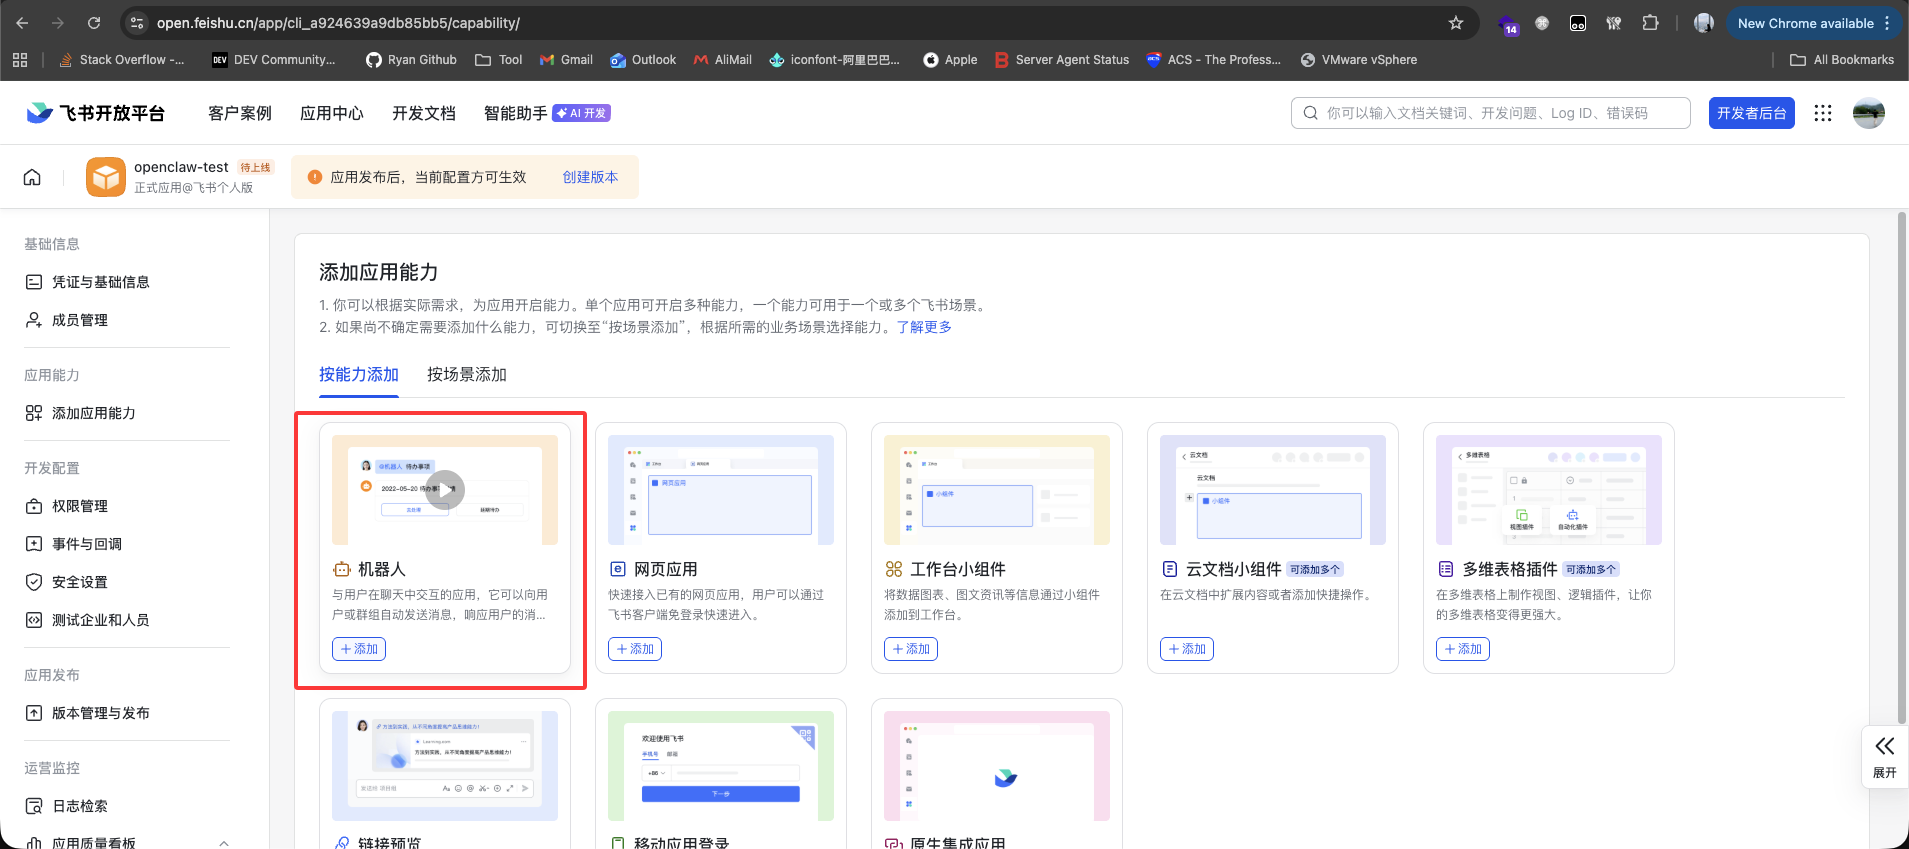
| ③ Add capability templates | Features → Bot Capabilities → enable “Receive Messages” and “Send Messages” | Do not enable unrelated templates; follow least privilege. |
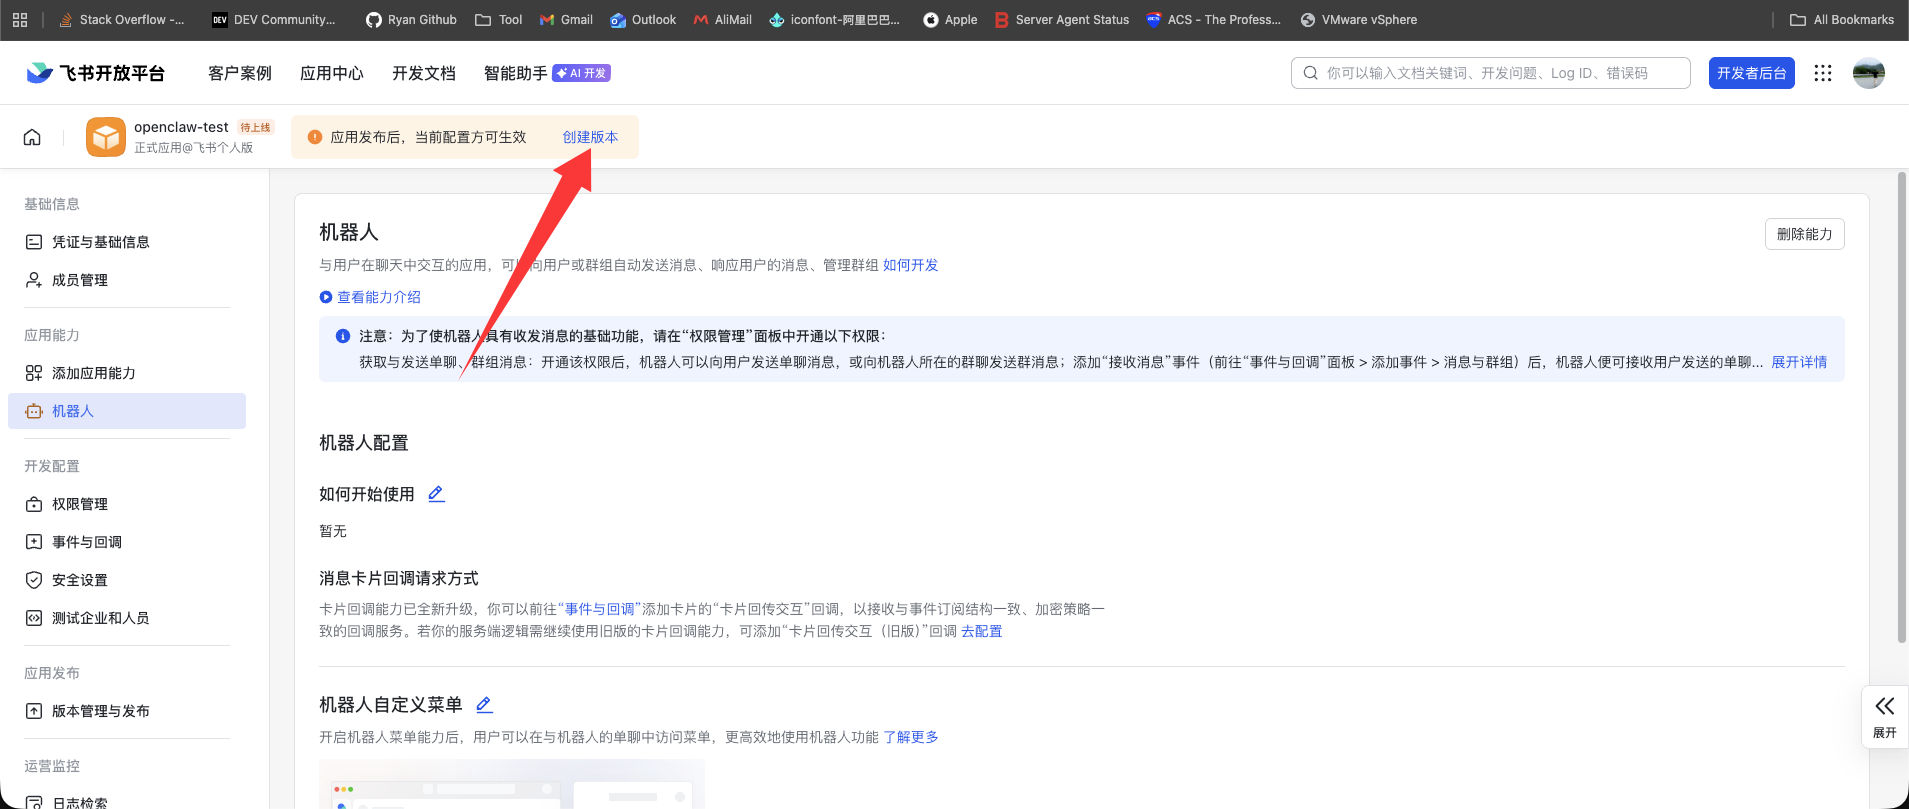
| ④ Create release | Create Version → enter a description such as v2026.3.7-initial → submit for review | Personal users may pass without review. |
| ⑤ Publish app | Release Management → Publish → choose “Public” or “Specific Departments” | Personal users choose “Public”; enterprises should choose specific departments. |
| ⑥ Configure event callback | Event Subscriptions → set the communication mode to “Long Connection” | ⚠️ Configure openclaw channels on the server first, or long connections cannot be enabled. |
🔐 Permission Security Rules (Required Reading for Enterprise Users)
Do not open all Feishu IM permissions. Granting every im: permission is dangerous ⚠️.
✅ Required: im:message:receive (receive messages), im:message:send (send messages)
❌ Never enable: im:chat:manage (manage chats), contact:user:read (read contacts), drive:doc:read (read cloud documents)
Reason: OpenClaw only needs to send and receive messages; extra permissions expand the attack surface. The same applies to DingTalk and WeCom.
Feishu App Configuration
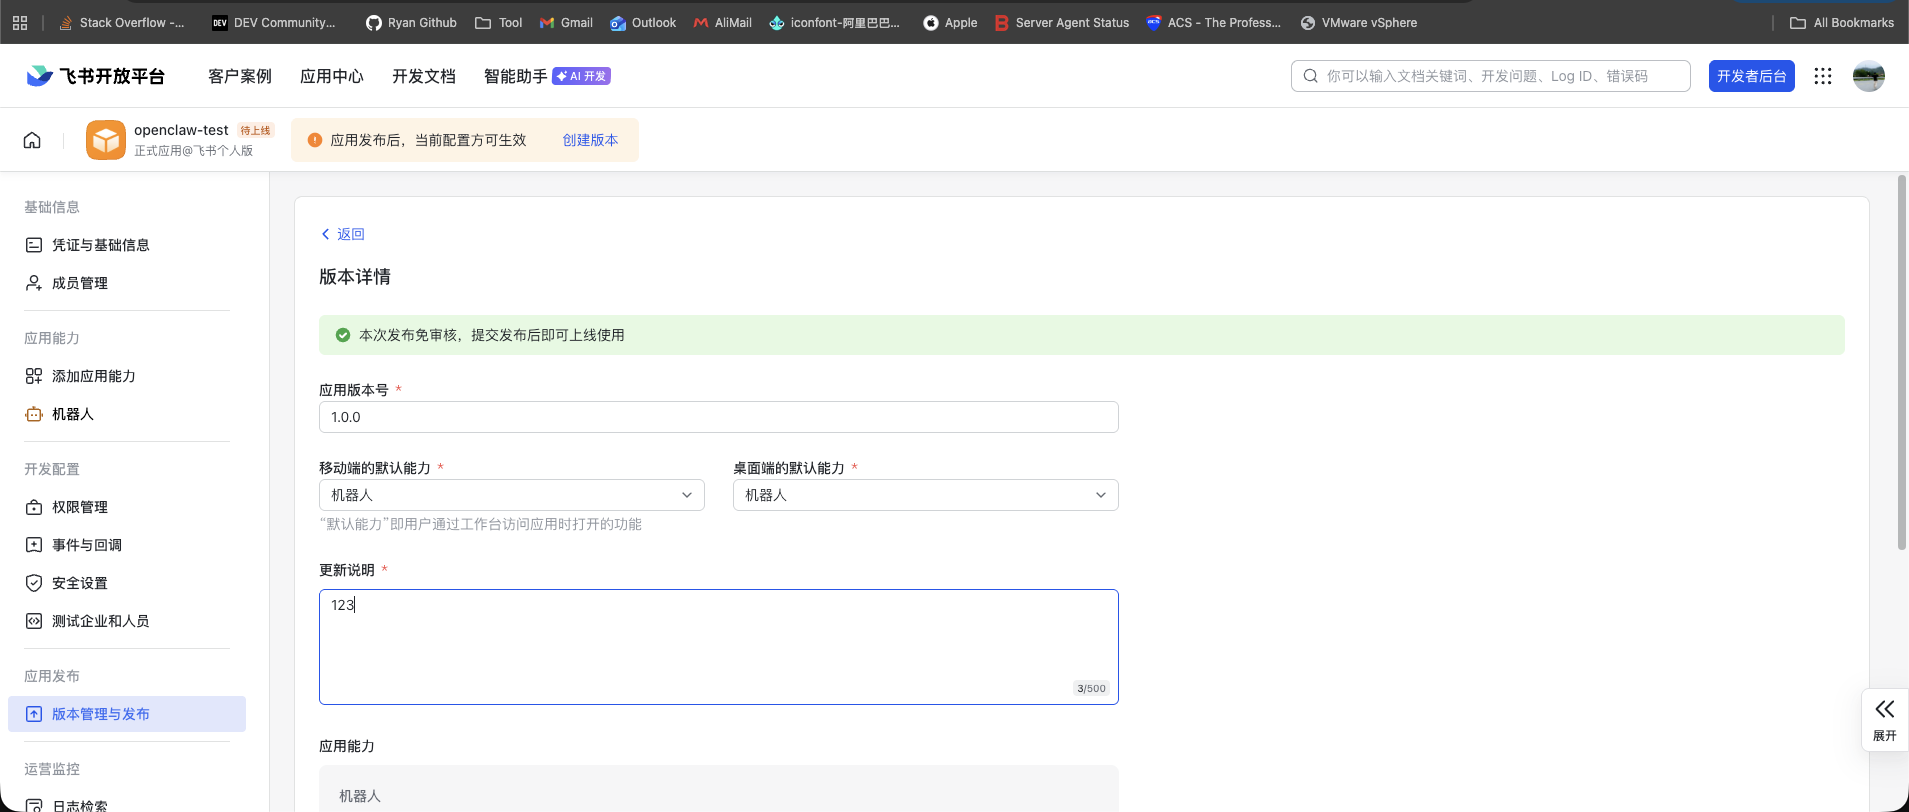
Configure Feishu in OpenClaw
- Run the command to open OpenClaw configuration.
ubuntu@test-openclaw:~$ openclaw config
🦞 OpenClaw 2026.3.8 (3caab92) — We ship features faster than Apple ships calculator updates.
▄▄▄▄▄▄▄▄▄▄▄▄▄▄▄▄▄▄▄▄▄▄▄▄▄▄▄▄▄▄▄▄▄▄▄▄▄▄▄▄▄▄▄▄▄▄▄▄▄▄▄▄██░▄▄▄░██░▄▄░██░▄▄▄██░▀██░██░▄▄▀██░████░▄▄▀██░███░████░███░██░▀▀░██░▄▄▄██░█░█░██░█████░████░▀▀░██░█░█░████░▀▀▀░██░█████░▀▀▀██░██▄░██░▀▀▄██░▀▀░█░██░██▄▀▄▀▄██▀▀▀▀▀▀▀▀▀▀▀▀▀▀▀▀▀▀▀▀▀▀▀▀▀▀▀▀▀▀▀▀▀▀▀▀▀▀▀▀▀▀▀▀▀▀▀▀▀▀▀▀ 🦞 OPENCLAW 🦞
┌ OpenClaw configure│◇ Existing config detected ─────────╮│ ││ workspace: ~/.openclaw/workspace ││ gateway.mode: local ││ gateway.port: 18789 ││ gateway.bind: loopback ││ │├────────────────────────────────────╯│◆ Where will the Gateway run?│ ● Local (this machine) (Gateway reachable (ws://127.0.0.1:18789))│ ○ Remote (info-only)└- Select channels.
◆ Select sections to configure│ ○ Workspace│ ○ Model│ ○ Web tools│ ○ Gateway│ ○ Daemon│ ● Channels (Link WhatsApp/Telegram/etc and defaults)│ ○ Skills│ ○ Health check│ ○ Continue└- Select Feishu.
◆ Channels│ ● Configure/link (Add/update channels; disable unselected accounts)│ ○ Remove channel config◆ Select a channel│ ○ Telegram (Bot API)│ ○ WhatsApp (QR link)│ ○ Discord (Bot API)│ ○ IRC (Server + Nick)│ ○ Google Chat (Chat API)│ ○ Slack (Socket Mode)│ ○ Signal (signal-cli)│ ○ iMessage (imsg)│ ○ LINE (Messaging API)│ ● Feishu/Lark (plugin · install)│ ○ Nostr (NIP-04 DMs)│ ○ Microsoft Teams (Bot Framework)│ ○ Mattermost (plugin)│ ○ Nextcloud Talk (self-hosted)│ ○ Matrix (plugin)│ ○ BlueBubbles (macOS app)│ ○ Zalo (Bot API)│ ○ Zalo (Personal Account)│ ○ Synology Chat (Webhook)│ ○ Tlon (Urbit)│ ○ Finished◆ Install Feishu plugin?│ ● Download from npm (@openclaw/feishu)│ ○ Use local plugin path│ ○ Skip for now└◇ Feishu credentials ──────────────────────────────────────────────────────────────╮│ ││ 1) Go to Feishu Open Platform (open.feishu.cn) ││ 2) Create a self-built app ││ 3) Get App ID and App Secret from Credentials page ││ 4) Enable required permissions: im:message, im:chat, contact:user.base:readonly ││ 5) Publish the app or add it to a test group ││ Tip: you can also set FEISHU_APP_ID / FEISHU_APP_SECRET env vars. ││ Docs: feishu ││ │├───────────────────────────────────────────────────────────────────────────────────╯│◆ How do you want to provide this App Secret?│ ● Enter App Secret (Stores the credential directly in OpenClaw config)│ ○ Use external secret provider- Obtain the App ID and App Secret.

- Enter the App ID and App Secret.
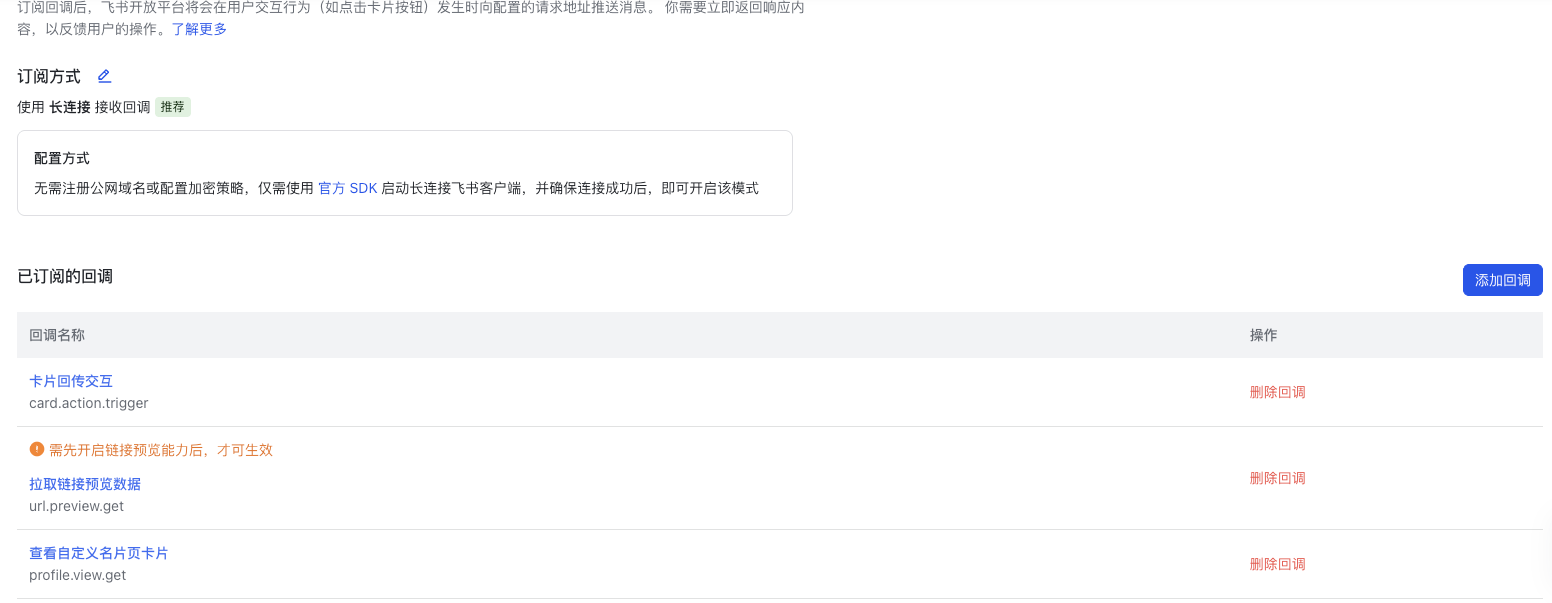
◇ How do you want to provide this App Secret?│ Enter App Secret│◇ Enter Feishu App Secret│ wOUixRKtgLf778k33ztgKeELr8RUNIsi│◇ Enter Feishu App ID│ cli_a924639a9db85bb5[info]: [ 'client ready' ]│◇ Feishu connection test ───────────────────────────╮│ ││ Connected as ou_10c87d95bf5698a86c85bf098853b195 ││ │├────────────────────────────────────────────────────╯│◆ Feishu connection mode│ ● WebSocket (default)│ ○ Webhook└◇ Which Feishu domain?│ Feishu (feishu.cn) - China│◇ Group chat policy│ Open - respond in all groups (requires mention)│◇ Select a channel│ Finished│◇ Selected channels ──────────────────────────────────────────╮│ ││ Feishu — Feishu/Lark enterprise messaging. Docs: ││ feishu ││ │├──────────────────────────────────────────────────────────────╯│◇ Configure DM access policies now? (default: pairing)│ Yes│◇ Feishu DM access ─────────────────────────────────────────────────────────────────────────╮│ ││ Default: pairing (unknown DMs get a pairing code). ││ Approve: openclaw pairing approve feishu <code> ││ Allowlist DMs: channels.feishu.dmPolicy="allowlist" + channels.feishu.allowFrom entries. ││ Public DMs: channels.feishu.dmPolicy="open" + channels.feishu.allowFrom includes "*". ││ Multi-user DMs: run: openclaw config set session.dmScope "per-channel-peer" (or ││ "per-account-channel-peer" for multi-account channels) to isolate sessions. ││ Docs: channels/pairing ││ │├────────────────────────────────────────────────────────────────────────────────────────────╯│◇ Feishu DM policy│ Open (public inbound DMs)Events and callbacks both use long connections. Note that a SOCKS connection must be established first.
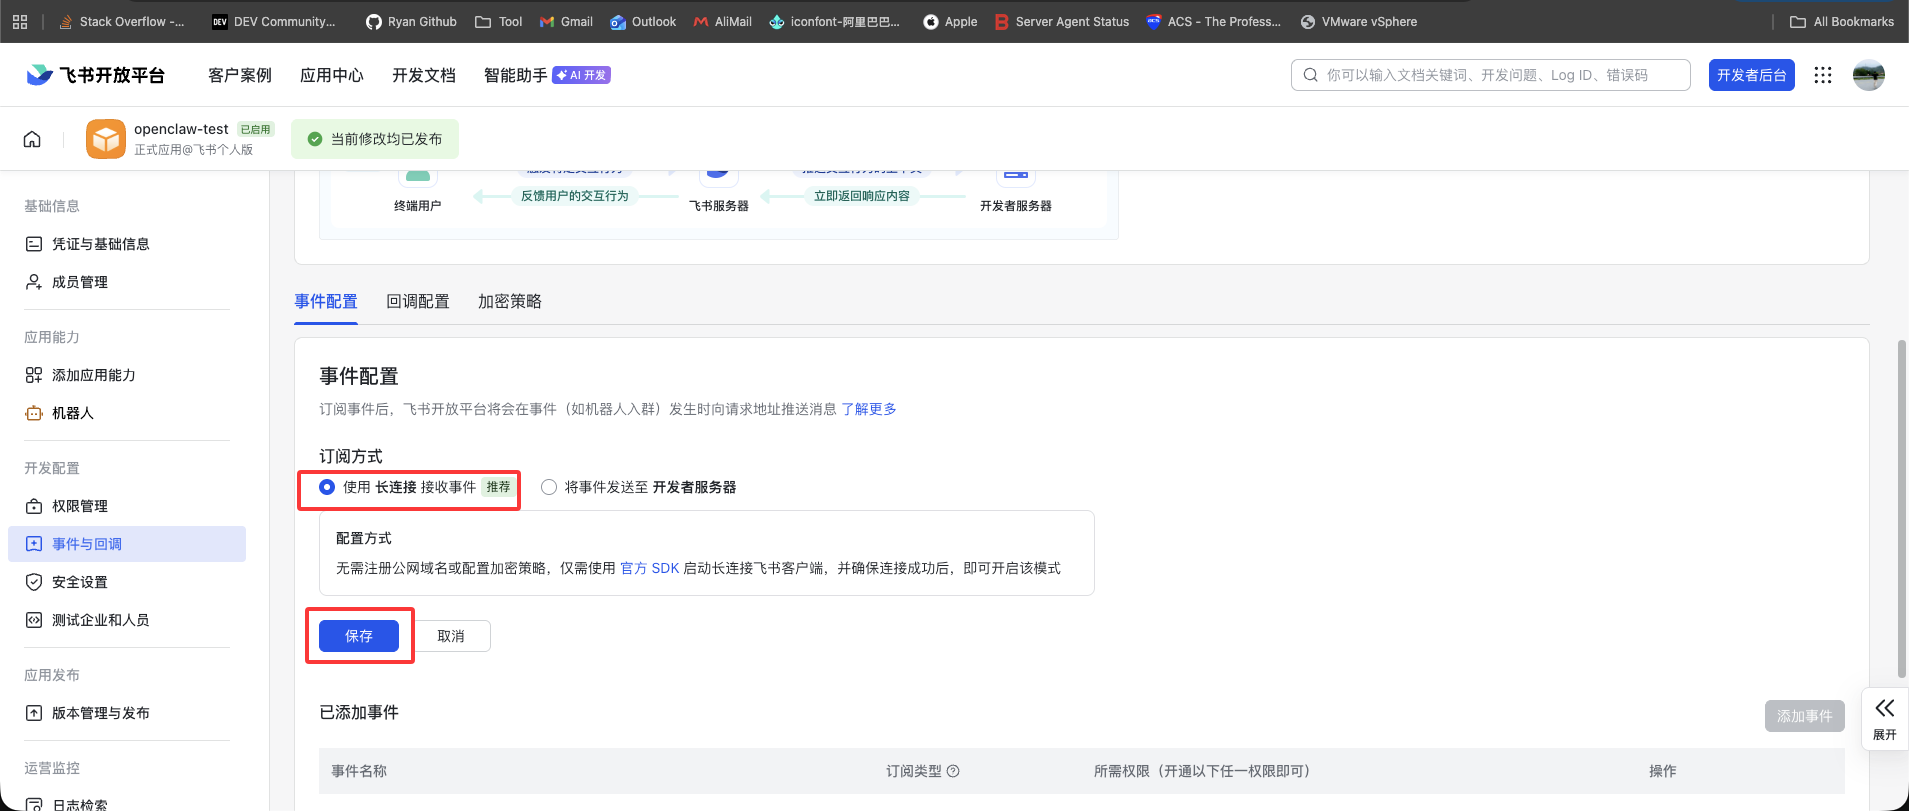
Event permissions must allow message reception, otherwise you cannot send messages to the bot.
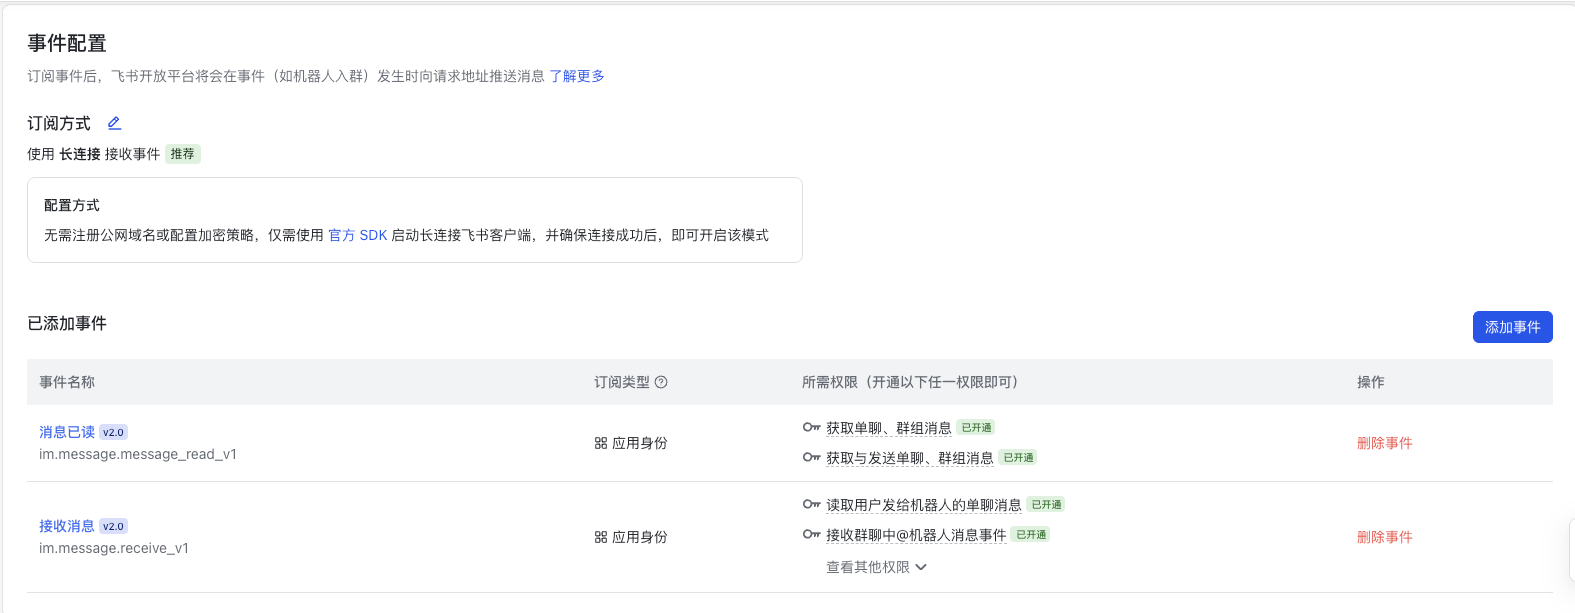
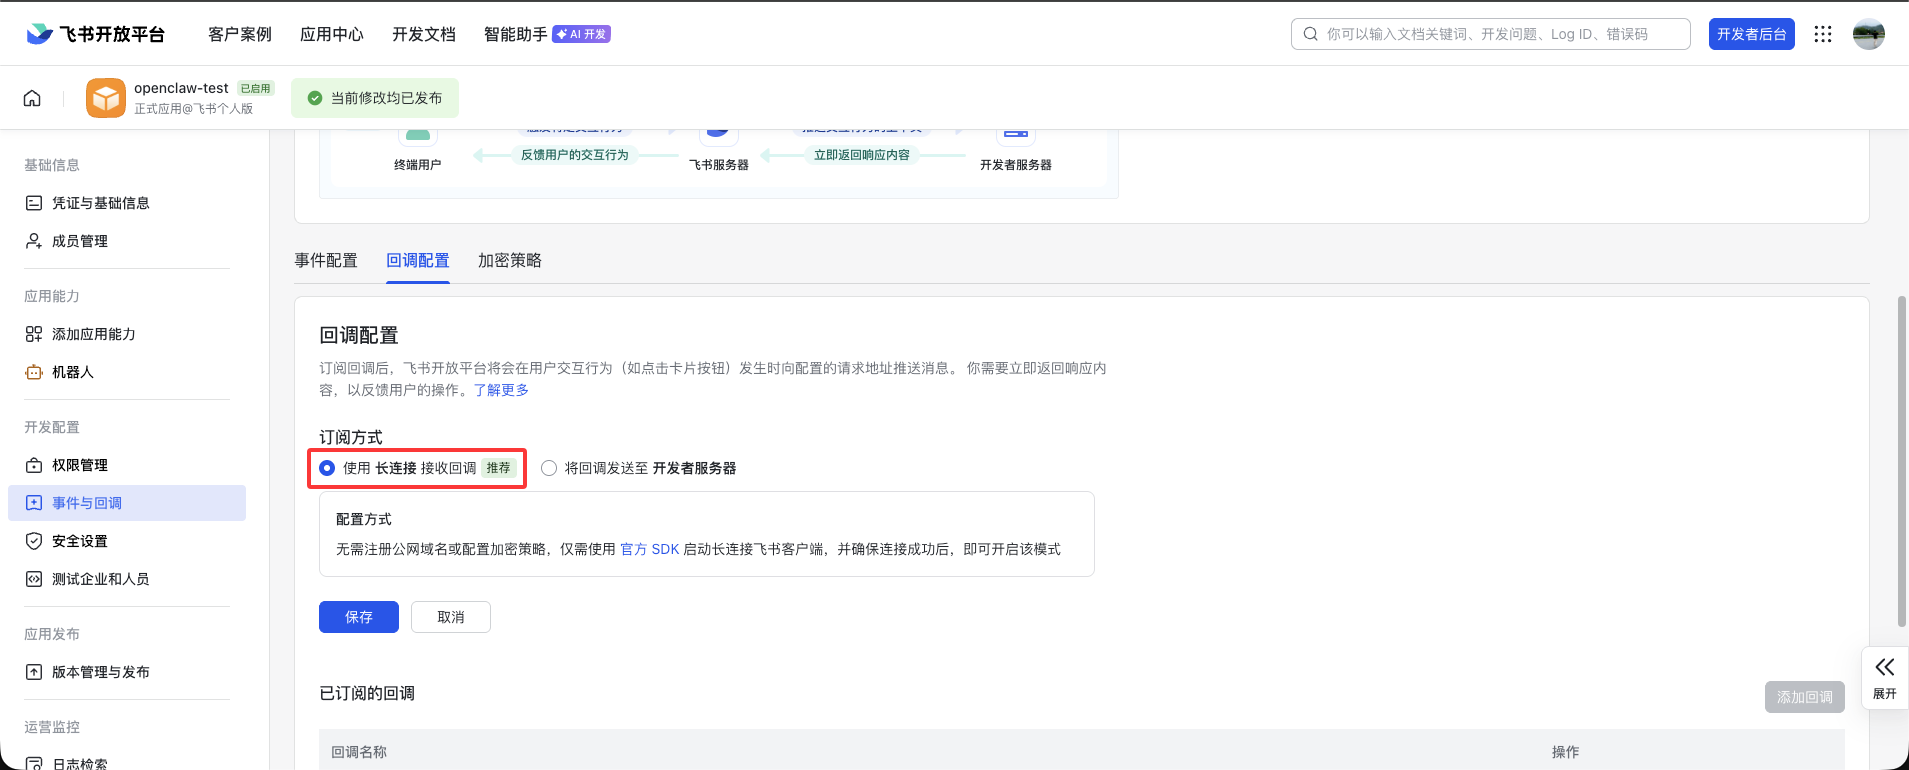
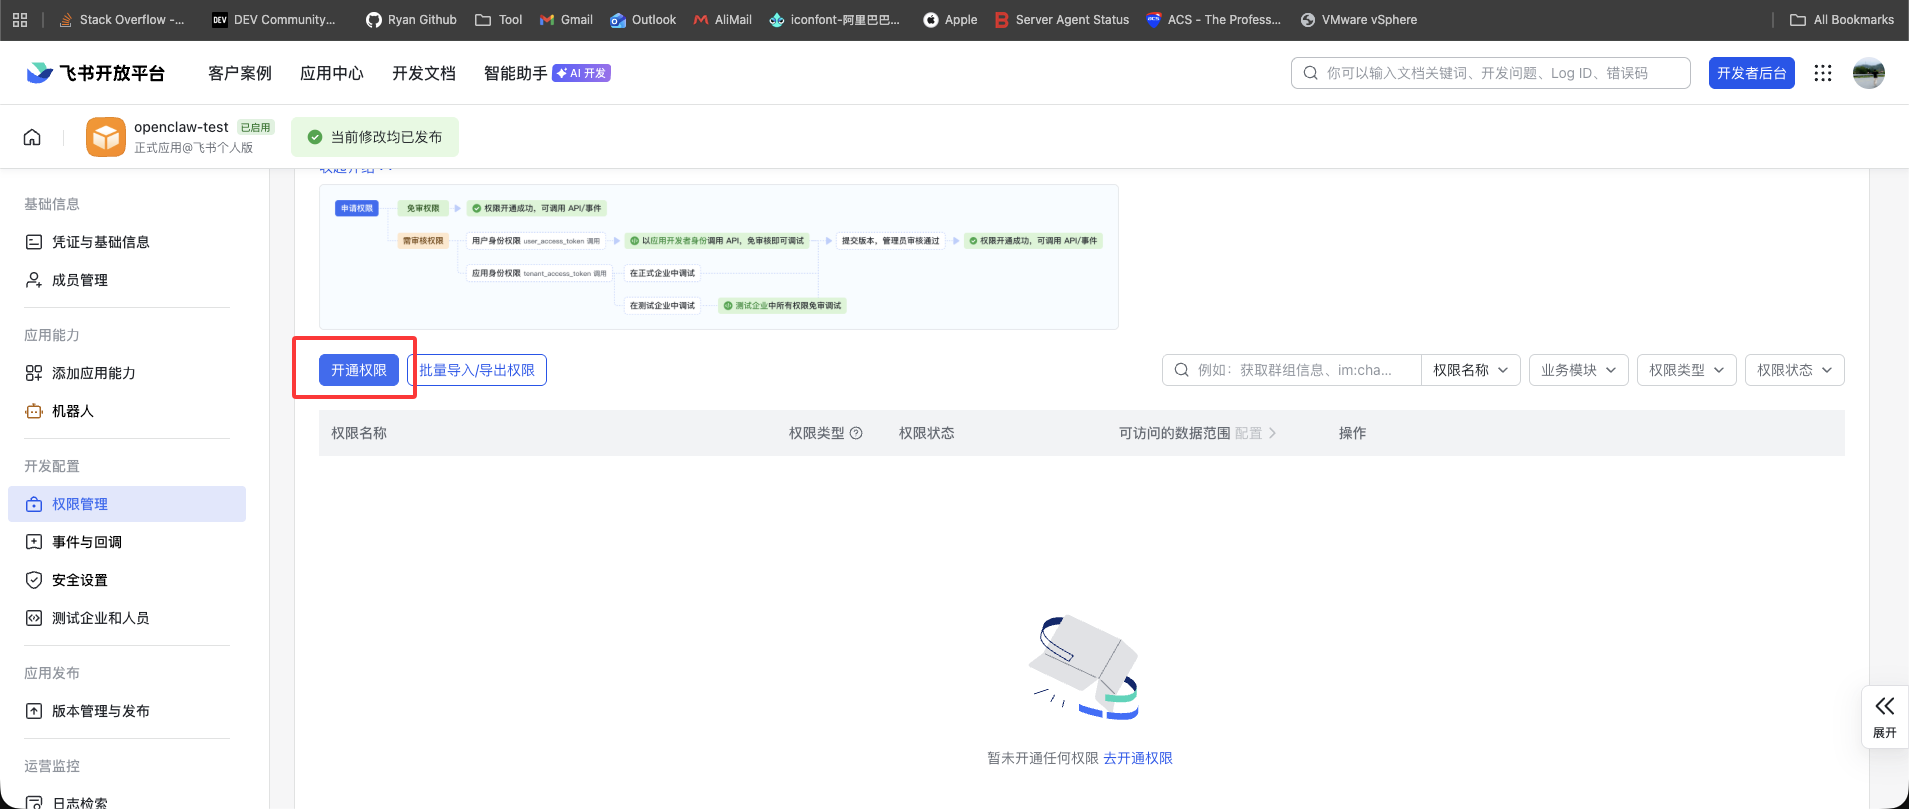
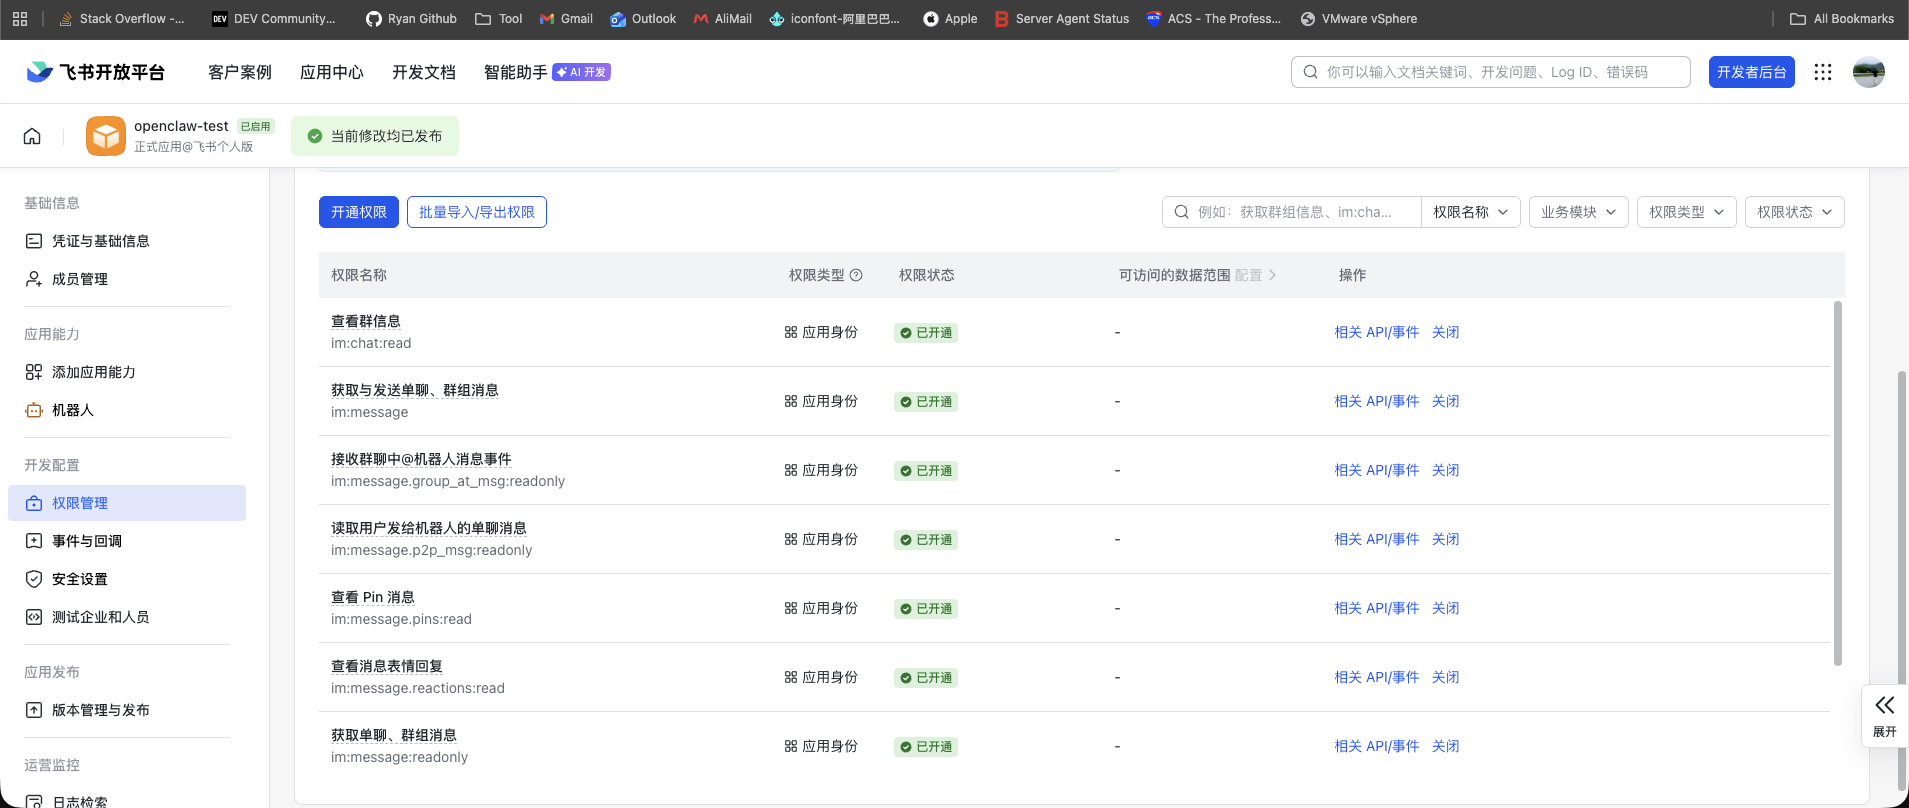
Permission configuration is critical. Do not grant every IM permission. That may be acceptable for personal use, but for enterprise Feishu it increases security risk. The same applies to DingTalk and WeCom.
Grant only read and send permissions; do not grant anything else.
🚨 Step 3: Common Issues and Solutions
Skills Installation Times Out
ubuntu@openclaw-test:~$ clawhub install agent-browser✖ Rate limit exceededError: Rate limit exceededubuntu@openclaw-test:~$Unauthenticated requests are rate-limited by default. Sign in and try again.
ubuntu@openclaw-test:~$ npx clawhub loginOpening browser: https://clawhub.ai/cli/auth?redirect_uri=http%3A%2F%2F127.0.0.1%3A36565%2Fcallback&label_b64=Q0xJIxxxxVu&state=0c711c635xxxx1f6Open the website, sign in with your GitHub account, and return to the previous page.
Run npx clawhub whoami. If your GitHub account name appears, it is working correctly.
ubuntu@openclaw-test:~$ npx clawhub whoami✔ hz157If redirection fails, manually copy the token shown in the browser and sign in.
ubuntu@openclaw-test:~$ npx clawhub login --token clh_-TRc6jxxxxxxJA✔ OK. Logged in as @hz157.✅ Final Step: Verify Success
Add the bot in Feishu and send any message, such as /help or “Hello”. A reply confirms that the configuration is complete.
🌟 On first run, OpenClaw automatically creates ~/.openclaw/workspace/AGENTS.md, containing a list of skills and usage examples—your private AI toolbox manual!
Final Thoughts
🌐 Installing OpenClaw is not merely deploying a tool; it is building a bridge.
It connects you to AI capabilities and leads toward automation, knowledge integration, and greater productivity. But remember: the bridge does not determine the direction; the person crossing it does. The installer is simple, Feishu configuration is smooth, and the skills ecosystem is extensive…
⚠️ The real complexity is not in the command line, but in three quiet questions:
Who Is Watching?
When you grant the bot permission to read group messages, you authorize not only OpenClaw but also every skill that may be loaded behind it, such as agent-browser and feishu-doc. Each additional permission is another unlocked door.
Where Does the Data Go?
Local execution ≠ absolute privacy.
If skills call external APIs for weather, translation, or web scraping, your requests, context, and even screenshots may pass through third-party services.
“Local” is a starting point, not the destination.
Where Is the Boundary of Control?
“Let it archive meeting notes automatically.” “Let it monitor competitors.” “Let it send the daily report.”…
The more powerful the functionality, the more important it is to ask: if it does this today, might it do something tomorrow that I never anticipated?
🔑 Security is not about shackling AI; it is about preserving human authority to interpret and veto. Least privilege, auditable logs, and human review of critical actions are not technical burdens but the cockpit instruments of the digital age.
You do not need to understand every line of code, but you must know how high the bridge’s guardrails are—and set them yourself.
📌 Treat this installation guide as a launch protocol, not an instruction manual.
The moment OpenClaw is installed, the real beginning has just arrived:
- You choose what to trust.
- You decide how much to expose.
- You continually calibrate the boundary between human and AI collaboration.
The most powerful AI is always the AI guided by someone who knows when to say “no.”
Support & Share
If this article helped you, please share or support!